 So, you want to learn how to frost a cake? There are many, many, many ways to do it. Ultimately, the technique you choose to use will be based on what makes you comfortable, but I’m hoping that this guide will give you a place to start!
A step-by-step guide penned by Kaitlin and photographed by P
Materials
- Offset Spatula(s)
- Spoons or knives may cut it when it comes to frosting cupcakes, but these are the way to go when it comes to frosting cakes. They’re available in a variety of sizes and shapes, but I think the best two to have in your arsenal are the 8″ model
and the 13″ one
.
- Bench Scraper
- In my opinion, this is the secret to getting a smooth layer of frosting. With a little practice, this will become one of your favorite tools.
- Dishers/Portioners/Ice cream scoops
- If you don’t have one of these, a large spoon will get the job done, but since I have a few (they’re good for portioning cookies), I’m using a #24 (1 1/3 oz) scoop
today.
- Turntable
- I always use a turntable to frost cakes. It’s an unnecessary investment if you don’t frost cakes with any regularity, but if you do, you’ll be so happy if you buy one. Look for them at small cake supply stores – they usually sell them there cheaper than you can find them at craft stores. If you really, really don’t want to buy one, rig one up yourself like Alton Brown did in Season 6 Episode 15 of Good Eats.
- Non-Slip Pad
- Slip one of these under your cake on the turntable and you will thank me, I promise.
- Rubber Spatula
- I never leave the house without one!
- Additional Bowl
- You will use this for collecting crumby frosting.
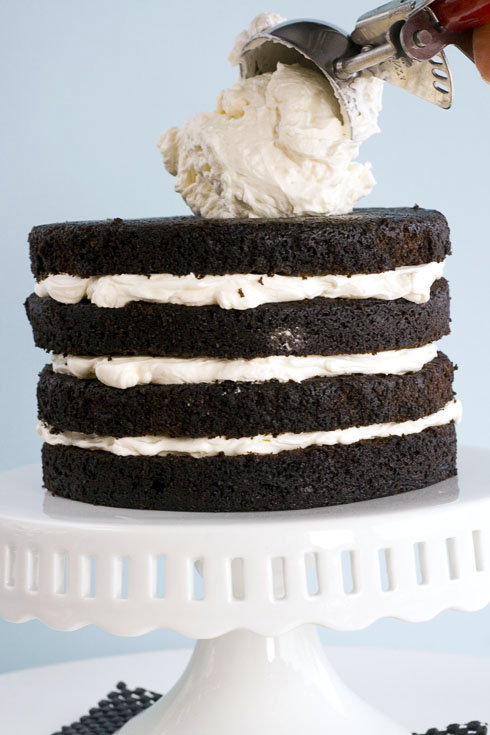
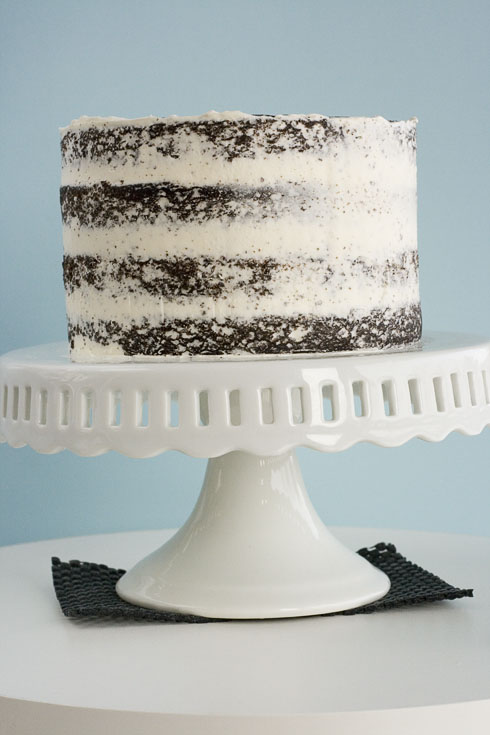
- A filled and stacked cake on a stand or cardboard round
- Yeah, yeah – I know this and the next point are obvious, but I’m just covering my bases. You’ve got to frost something, right? (P.S. I got this cake stand at Home Goods)
- Frosting
- Use whichever kind you like – this technique is universal. Feel free to head over to my tutorials for Swiss Meringue and Italian Meringue, if you’d like some help with those, too!
I don’t have a photo for the first step, but it’s important, so listen up! Before you begin, you’ll want to “deflate” your frosting a little to remove what may become obnoxious air bubbles. To do this, beat you frosting on the lowest speed possible of your stand/hand mixer for about five minutes, then proceed.
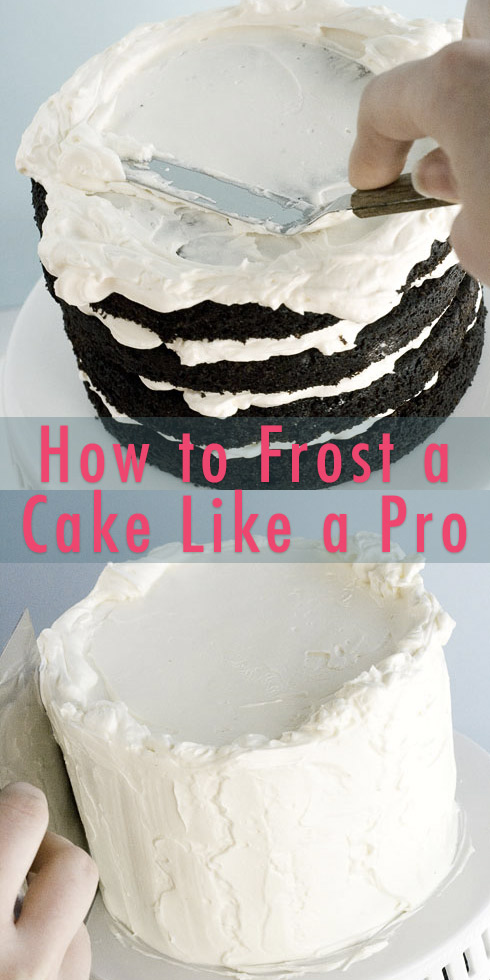
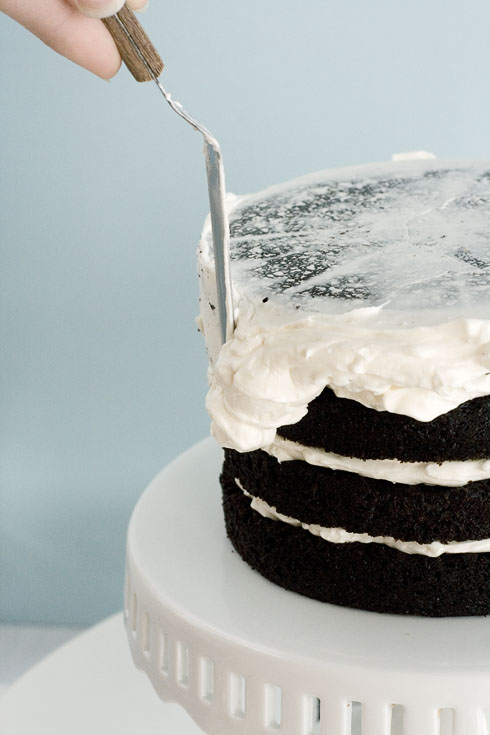
Starting with a stacked cake, drop on a small amount of frosting for your crumb coat. I used 2 scoops from a 1 1/3 oz disher. You don’t need too much; this first layer of frosting will be very thin because it just there to hold in crumbs and prevent them from getting in the final coat.
Press the mound of frosting down and out with your offset spatula, spreading from the center to the edge. You can drag the offset along the top of the cake, but don’t scrape it so hard that it tears.
This whole task is easiest to do if you use a swiveling motion with your wrist; tilting it gently left and right as you spread to more easily maneuver the frosting. This technique might not make much sense when you read it, but I think it’s a natural movement. Truthfully though, the most important thing is to make sure that you’re comfortable. Do what works for you!
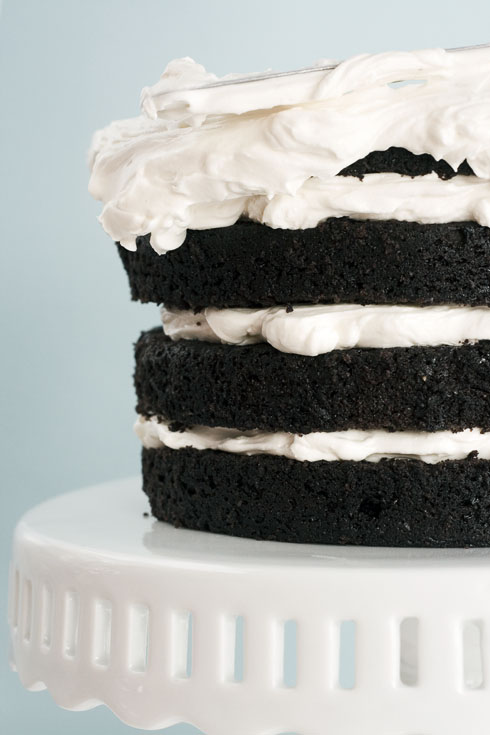
Continue spreading the frosting outward from the top so that it hangs over like this. This is how you will crumb coat the sides.
Using the same swiveling motion, begin spreading the frosting around the sides of the cake. Don’t be alarmed if working at this angle feels awkward – it always feels kind of strange. Also, don’t worry if dabs of frosting fall off the cake. Just scoop any stray bits up and keep working with them. However, whatever you do, DO NOT use your offset spatula, which is surely covered in crumbs, to scoop additional frosting out of its container. If you need more frosting for your crumb coat, use the disher/spoon to put more on top. Once you get crumbs in your frosting, they can be very difficult to get out, so be careful.
Also, if you’d like to scrape the built-up frosting on the back of the spatula off, don’t be tempted to do so on the cake’s corners (the 90 degree angle consisting of the top and the side). Scrape the spatula on a separate empty bowl, then scoop up the residual frosting to add back to the crumb coat, if needed.
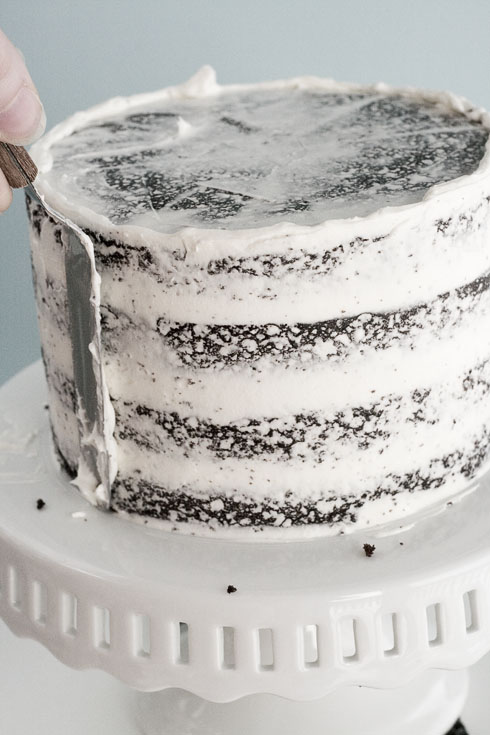
Continue working the frosting around the sides of the cake until every inch – from the top to the bottom – is covered.
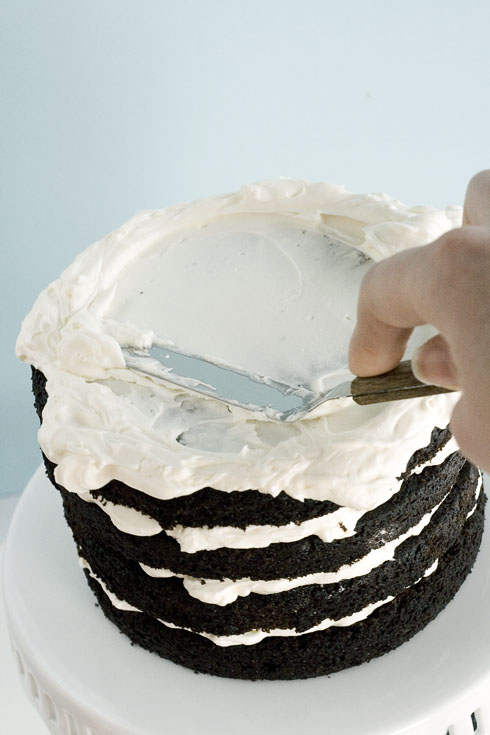
Now it’s time to thin the frosting, which helps really seal in the crumbs. Start with the top, using your offset to pull frosting from the edge of the cake, over the center and sweep the excess off. Run the underside of your spatula over the edge of a separate bowl (mentioned in step 4), then sweep across the top repeatedly until most of the frosting has been removed.
Use your bench scraper, held at about a 45 degree angle to the cake, to scrape off additional frosting by spinning the turntable toward it. Don’t press too hard, which could cut the cake, but press firmly enough that it scrapes some frosting off. Transfer frosting to your designated bowl and set aside.
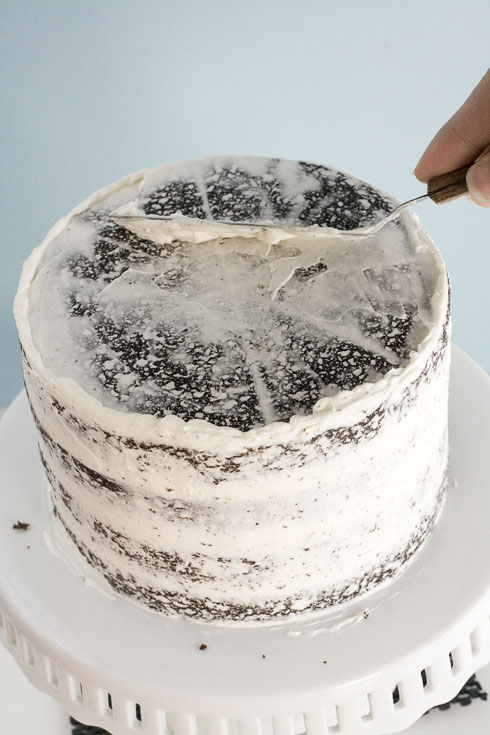
Congratulations – you’ve got yourself a crumb-coated cake! Most of the frosting has been removed, leaving you with a nice, thin coat to seal in crumbs and prevent them from bugging you in the next few steps.
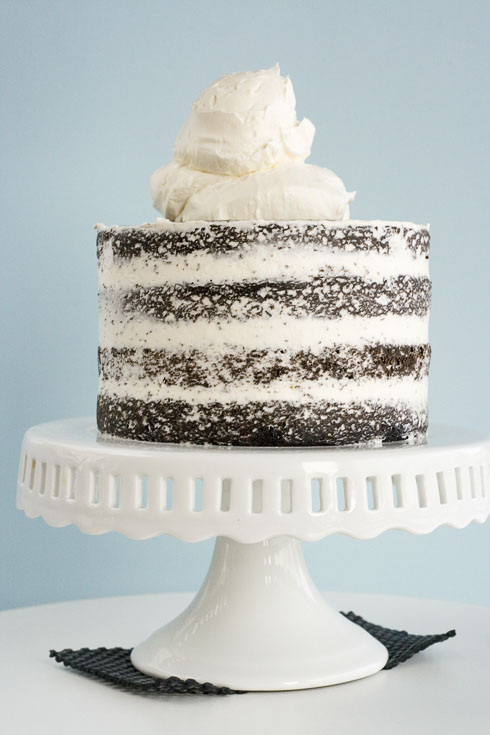
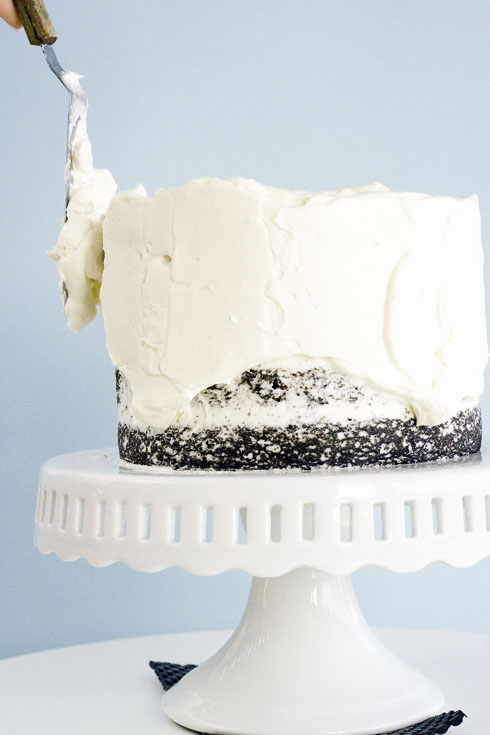
Using your disher, scoop on a pile of frosting. Some people put on what they estimate to be enough to frost the top and bottom of the cake at this stage, but I don’t like to do it that way. Seeing that much frosting all at once freaks me out and I always have a problem with it falling off the cake before I’ve finished applying it. However, that method does work for some people, so I advise you to do whatever makes you comfortable!
I put on 3 scoops, which I thought would be enough to cover the top of the 6″ cake and a little bit over the edges. However, this amount won’t be enough for every size of cake, so be sure to adjust accordingly. One thing to learn from the alternate method is that more is better for this job, so don’t be frightened about piling it on!
Using the same method that you used when you filled the layers of the cake, flatten out the mound of frosting with your offset spatula and work it out just over the edge (like in step 3), maintaining an even layer of frosting. It can be as thick or thin as you like; just make sure that you can’t see the cake beneath it. Turn the turntable while you work, and spread in circular motions to even things out. Don’t worry about getting it too perfect at this point because we’ll come back to it later.
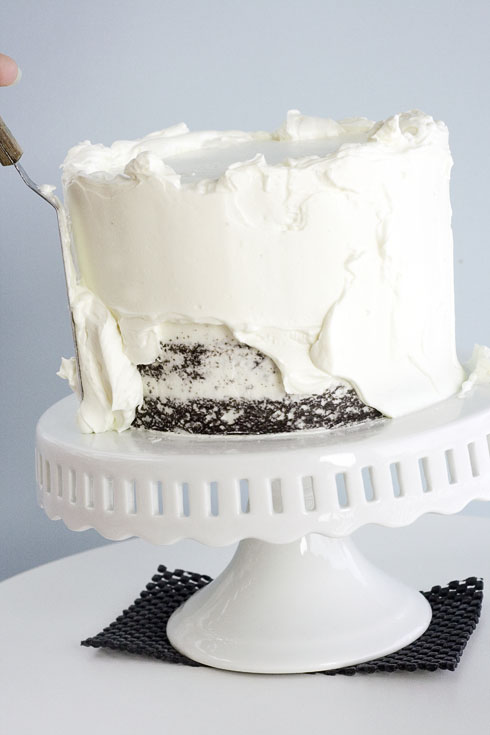
Before applying more frosting to the sides, flatten out the overhang.
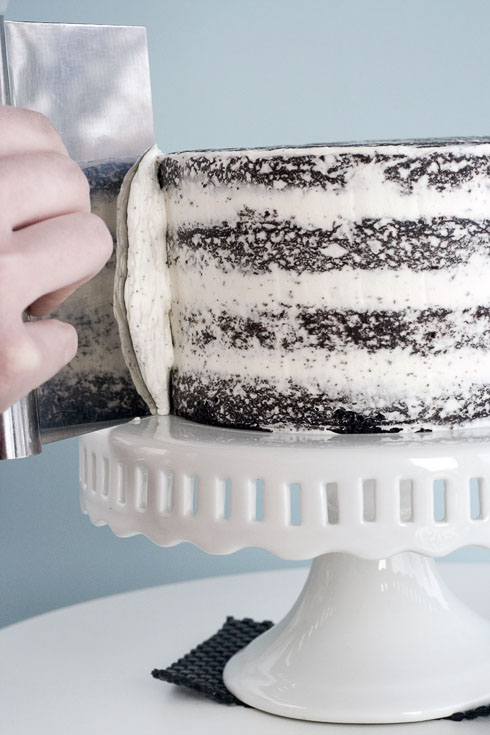
After that’s done, use a clean rubber spatula to scoop more frosting out of the bowl and transfer it to your offset spatula. You can simply scoop with the offset, if you like, but doing so increases the risk that you will get crumbs into your batch of frosting. Gently touch the loaded spatula to the side of the cake and begin spreading, being careful not to sweep your offset outside of the available frosting, which could introduce crumbs.
I worry about crumbs a lot. Have you noticed?
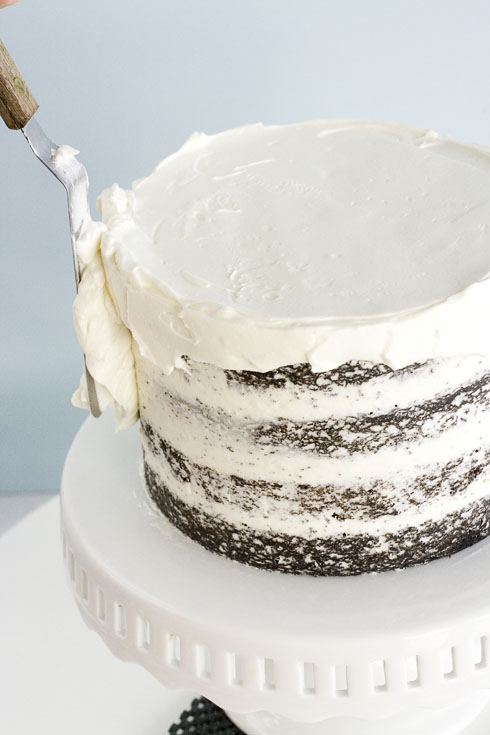
Continue spreading the frosting around the cake, applying excess frosting around the top rim of the cake which we will be using later to smooth out the top. Begin on the high side of the edge and work your way…
…to the bottom. It doesn’t need to be too smooth for now, just try to make sure the coat is fairly even without too many low spots. Also, note the raised edge that I mentioned in the previous step. Make sure that you have this, or it will be difficult to smooth out the top later. If you’ve forgotten, add it at any time by applying small dabs of frosting to the top edge.
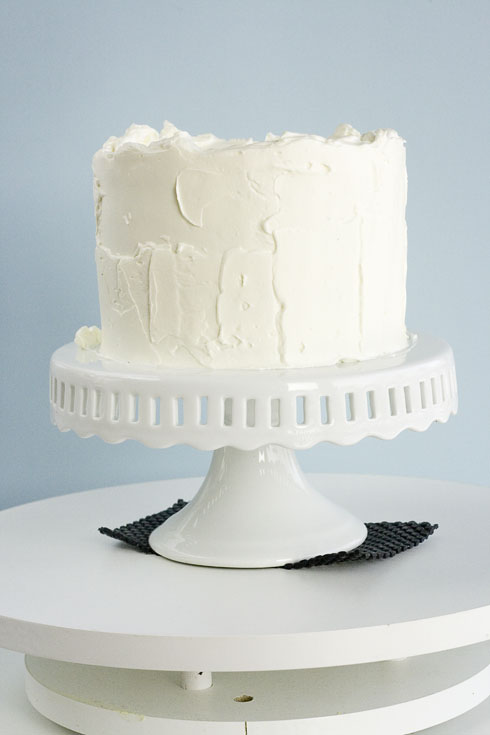
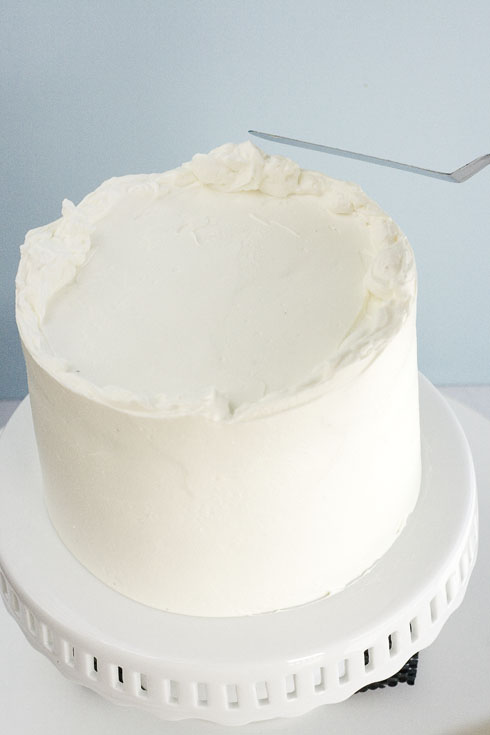
Ok, you’re in the home stretch! The cake doesn’t need to be any smoother than this at this point, and it would be just fine if it was messier. The next few steps will even everything else out.
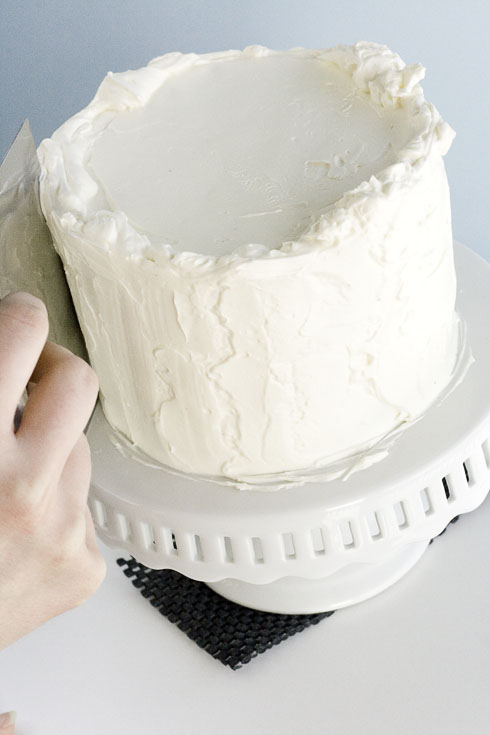
This is the trick to a smooth cake: the humble bench scraper! You’ll use it just as you did before (by holding it still at about a 45 degree angle and turning the turntable toward it), but this time you have to be very much in control of the pressure you’re applying so you don’t leave marks. Keep your hand very steady and still, and remember that you aren’t necessarily trying to remove the frosting, you just want to even it out. Be sure that the bench scraper is perpendicular to the stand so that your cake isn’t at all conical.
This step takes practice, but don’t be discouraged. Keep at it! After two or three sweeps all the way around, move on to the next step.

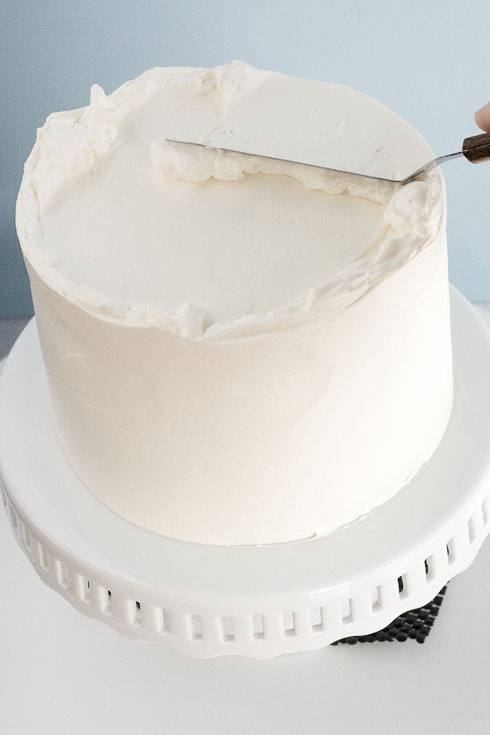
Ok, so you’ve probably noticed that there are some uneven spots on your cake. Don’t worry – you haven’t done anything wrong! Use a CLEAN, DRY offset spatula to apply small amounts of frosting to the low spots, then use a CLEAN, DRY bench scraper to re-smooth.
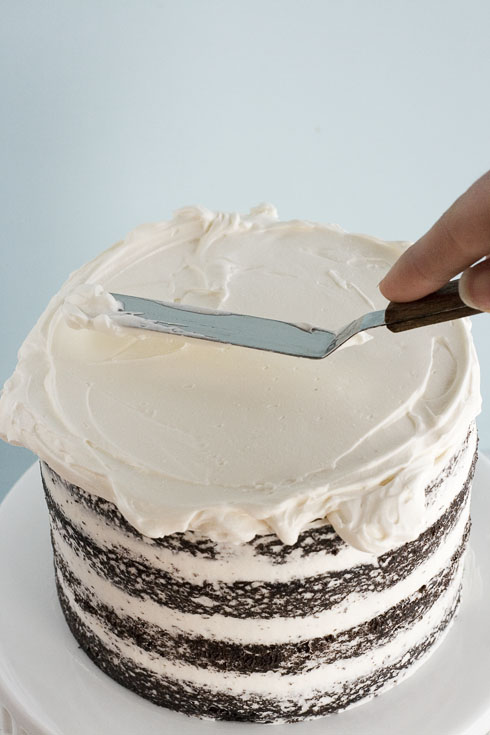
After you are satisfied with the edges of your cake, move on to the task of smoothing the top. Use a longer spatula, if you like, but this 8″ one is what I was comfortable with for a cake this size. Place your spatula just beyond the side furthest from you at about a 45 degree angle, aligning the bottom edge with what you estimate to be the height of the inner layer of frosting…
… And scrape the frosting toward you, sweeping off when you get to the center of the cake. Clean your offset spatula.
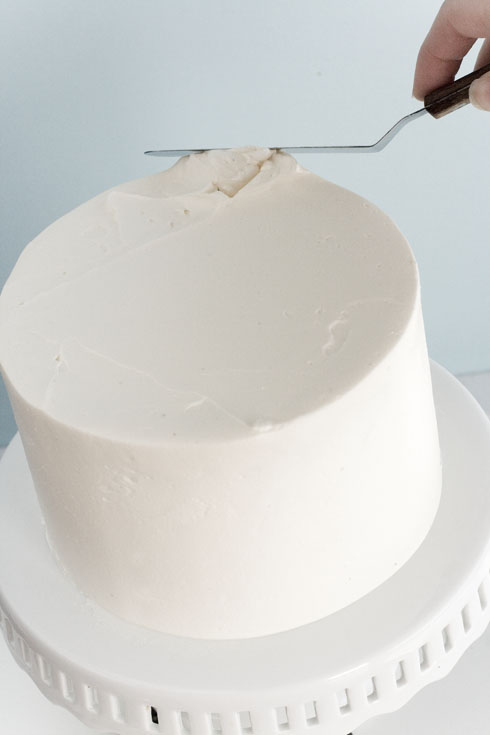
Repeat this technique around all sides of the cake, cleaning the spatula each time, sweeping the last raised edge into the center, just as before.
Professionals would probably tell you to stop there. However, sometimes I’ll add a little more frosting on top and spread it thinly over any imperfections, being very careful not to sweep it over the edges. But really, if there are a few marks on the top (or sides) it’s not a huge deal!
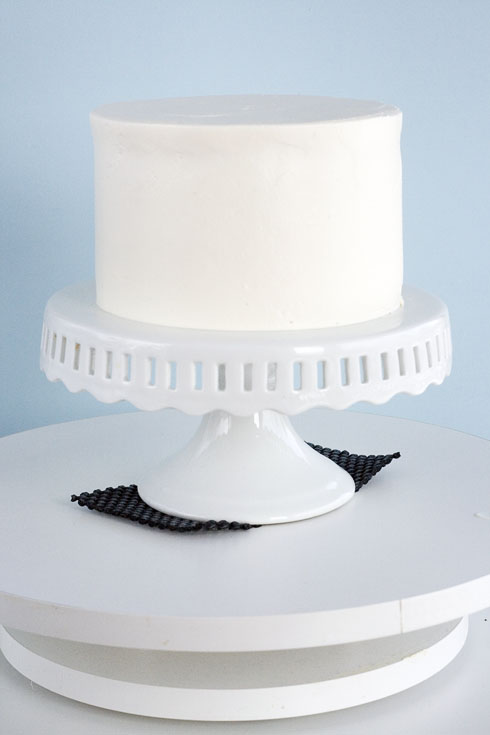
Guess what? YOU’RE DONE! Continue decorating the cake any way you like or just leave it as is.
Don’t stress yourself out over getting the frosting just so. If you start getting frustrated with it, stop and remind yourself that you’re doing this for fun. Who cares if it’s perfect? It’s a cake. You’re just going to eat it, anyway!
Wow, that's beautiful! I am lousy at frosting cakes so thank you very much for this post, and the one before it, they are very helpful :)<br /><br />Come check out my competition!<br /><br />http://for-goodness-cake.blogspot.com/2011/02/valentines-day-competition.html
Crumb coating is fine I use a glaze to crumb coat as it seal if it going to be sitting out or awhile. Otherwise I never crumb coat. It is real somple to frost without and never get a crumb. Just make sure spatula never runs of the icing and touches the cake Also frosting with an icer helps. I smother with a plastic smoother
Fabulous. I have cakes cooling right now. I'll be trying this tomorrow! Thank you!
Great tips! I can't wait to try it out!
Sheer perfection. Can't wait to put your techniques to use but I think it's going to take a long while for me to get to your standard 🙂
You make it look so much easier than it feels when I'm doing it! Thank you so much for this, I will definitely be using your tips for my next cake 🙂
Wow, hard to believe you're only around my age, I would've guessed you were one of those baking mums just from your superb-quality photos. Wish I still had the chance to bake like you do!
That's a perfect frosting!! Thanks for sharing 🙂
Oh my god this just awoke my sugar tooth. Thank you for sharing!<br /><br />http://notsocountry.blogspot.com/
Wow, i can never get it perfect,yours looks so great!Thanks for the tut!
Great job!! Looks fantastic and you provided excellent tips!!
My cake decorating really started looking professional when I began to use a bench scraper. It makes such a difference!<br /><br />Nice post!!
This is the BEST frosting tutorial I've ever read. I am terrible at frosting cakes, and in fact, this past weekend I did a cake for my daughter's birthday and while it was delicious and lovely, it did not look the way I wanted it to, because I had so much trouble frosting it. I can't wait to try your method!! This is awesome.
Thiss looks absolutely wonderfull!!<br />PLEASE PLEASE PLEASE Answer my question! :P<br />Im a beginner baker and my cakes always taste like flour or they have an egg-like taste :/And they are all sticky in the middle and they dont look spongy :(<br /><br />Please Help!! <br />Could it be because we moved in a new house and i now have an electric oven?<br />I only tried baking a cake once in the
Thanks for doing this tutorial! I have had so much trouble frosting cakes and I can't wait to try one out with this method. This is seriously so helpful! <br /><br />-Erin O.<br /><br />By the way you are so incredibly talented, keep up the amazing work! I love your blog!!!
Thank you for sharing. Great tutorial.
I'll never have to take a decorating class at michael's again! Lovely pictures!
Great tutorial!! Love this… I posted a link on ediblecrafts.craftgossip.com 🙂
I find bench scrapers too heavy and bulky for flat icing – I use this instead:<br /><br />http://www.amazon.com/Ateco-1303-Bowl-Scraper/dp/B000KEUKO2/ref=sr_1_4?ie=UTF8&qid=1297837889&sr=8-4<br /><br />It's very lightweight and easy to handle, and as a bonus it's super inexpensive! <br /><br />Your cake looks great, and the crumb coat is the best secret weapon!
That frosting looks perfect, thank you so much for this tutorial. Do you need to cool the cake between steps of can you do them all one after the other? <br />I saw a youtube video once where the baker would cool the cake in the fridge after the crumb coat and before putting the rest of the frosting and I was wondering if you consider this a good idea.
A brilliant tutorial! Thank you! It all makes perfect sense when you do the steps in the right order. I always smooth the top before fixing the sides, then I end up smoothing the top again and again and again……<br /><br />Also love the bench scraper idea!
Thanks so much for the beautiful, accessible tutorial. I've never been able to frost cakes well, but now I think I will!
Thank you so much! It´s an amazing tutorial! Lau.
Wow! Thanks for posting this! I have a sneaky suspicion that my cakes will look much better after today…
Hi Kaitlin, I'm so glad I came across your blog. I have to tell you that I'm floored after reading your bio! I had thought…and I know you prob get this a lot…that you were some experienced bakery owner. I thought, wow how nice of her to put on this tutorial. I am 26 and came across baking until after I was done with college…I'm only about 3 years in and need a lot of practice.
Perfect!~thanks for the info.
Exceptional tutorial! I never would have come up with the bench scraper tip, that's a good one indeed. Thanks for sharing. 🙂
fantastic tutorial!
THANK YOU! This is fabulous
Beautiful tutorial. Thanks for sharing.
Great tutorial with some great tips, Kaitlin!
This is impossibly PERFECT! 🙂 Well done!
this was so helpful, thank you!! I think my biggest problem is that I am a little stingy with the icing. I can't wait to try your techniques 🙂
WOW.<br /><br />so, that explains a lot. Now I know why my cakes always turn out somewhat crumbly.<br /><br />THANK YOU!
WOW! I am bookmarking this post right now. Thank you for the tutorial. I really need this. Well done, my friend.
Awesome, awesome post. I am so passing this on! So helpful!
Awesome tutorial!! I've seen my share of tutorials, now have passable talent at it too, but this one was truly helpful!
WOW! Great tutorial, thanks for sharing your tips and for posting pictures as well…they are very helpful.
I'm SO happy that you guys found this to be so helpful! Thank you for all of your kind words. It means a lot to me! <br /><br /><b>@Jessi</b>: I'm not really sure what the issue is. Maybe the cakes are underbaked? Have you tried leaving them in longer? I would definitely invest in an oven thermometer, especially since you're in a new house. They aren't very expensive and
wow. i love baking & creating and am trying my best to get into cakes and decorating them. i swear i have no patience for it. still trying…<br />your cake and your frosting are just perfect. nicely done indeed.
A clean, white, frosted but undecorated layer cake with tall, straight sides is seriously one of my favorite things in the world. It is a thing of beauty.
beautifully done — so helpful! and i'd kill for a slice of that cake…
oh! i really wish i had these tools! this looks really great and i'm sure I could do it.
How much frosting does it take to do a cake like this? I find myself having to put a really small amount of frosting in between the layers in order to have enough on the sides and top if I use one batch. Do you double your recipes? PS – my cakes have never – ever – looked this beautiful, but you've inspired me to give your tutorial a try. Thanks!
I think you meant to say a 4oz disher, not a 24oz disher.
This is gorgeous. Well done.
Yes I need to use my scraper! Duh!! I never even thought of that!!! Brilliant!
Its 3am. Thanks to bookmarking this page of yours about 6 months ago…I was able to frost a 6 layered rainbow (!) cake for my daughter's first birthday tomorrow. I'm beaming. Might be lack of sleep…but I'm pretty sure its the gorgeous cake I have to show off to family and friends.<br /><br />Thanks for sharing your knowledge and yummy recipes. We ALL appreciate it!
You should get a bigger offset spatula. It makes frosting WAY easier and it looks a lot better.
Hoping over from Eat at Home. <br /><br />Impressive!
This was a great help a few weeks ago when I made my first layered cake. It's not up to your standards, but it was the nicest cake I've ever made. Thanks for the info. Your site is quite impressive.<br /><br />http://yinzerella.wordpress.com
Best frosting tutorial ever. seriously, I need this kind of detailed directions.
Great tutorial. I am going to have to give this a try!
This is absolutely beautiful! Very helpful and great photos!
Wow! You make it look so easy!!! Awesome! 🙂
Being a professional cake decorator for 30 years it really is easier using a regular cake spatula with the same suggestions. The small offset spatula works great for smoothing small areas of icing but it takes a lot longer to do it over a large area.
This was great! I have never been shown how to do this, just always did my own thing and it never turned out this beautiful. Thank you for showing me! 🙂
Bunny, I use the amount stated in each recipe for the cakes on the blog. I think I just used a 5 white batch for this 6" cake.<br /><br />Mere, thank you!<br /><br />Mommy, Papa and The Nuts – wohoo!!!<br /><br />Anonymous, this one works for me for a cake this size.<br /><br />Yinzerella, I'm glad it helped!<br /><br />Dandy, aw – thanks!<br /><br />Anonymous, this size spatula works
One day when I grow up, I shall frost a cake like you. (gonna be 36 soon…maybe this is the age when I do finally grow up? ;)<br /><br />I will follow all your directions today. One quick question, why are my cakes not even on the sides, eventough I use the same brand and size pan? Sometimes they shrink in a bit, especially towards the top. So when I place them on top of each other the sides are
Sibel—I'm not sure exactly why your cakes do that. I've been living at high altitude for so long, the science of cakes is just something I'm waiting to figure out for when I get to sea level again.<br /><br />But I do know you can buy these little thermal strips at cake decorating supply places. I know they sell them at Michaels. But you put the strips around the cake pan, and they&
No, I never have. I've been curious about them, but I think those are just for stopping domes from forming.
You can also cut an old dishtowel in strips about the 3-4" wide, wet one & wrap around outside of pan & clip together with a clothespin. This will make your cake bake evenly. Learned this in a cake decorating class.
Aw 😛 I hope the directions were helpful!<br /><br />Sometimes that happens to me, too. What kind of cakes are you noticing the trouble on? I find it is more common when I'm baking a chiffon-style cake with egg whites folded in at the end. I, unfortunately, don't know why though :(<br /><br />As for cooling, my standard process is to cool in the pans for 10 minutes, then turn out onto
An even cheaper item is a plastic smoother from the paint store. They run about $1.00-$1.50 each. <br /><br />I turn my cakes out immediately out of the oven onto the plastic wrap, industrial strength like from Sam's. It holds in the moisture and you'll never have a dry cake.
That's the best tutorial I've seen. And I've been interested in cakes a long time! Great job, Kaitlin!
Thanks very much! I'm glad you liked it!
THANK YOU! After paying for a cake last year, that by the way was not finished an hour before the party because the lady forgot, and having it taste like poop, I decided this year I am going to make my daughter's cake! I plan to do a simple cake just like yours with fondant woodland animals on it. 🙂 This tutorial is PERFECT! Even if I have uneven places like the ones you filled in it will be
This was a wonderful, detailed tutorial! I'm just learning how to bake cakes so this was really helpful for my baby steps! 🙂 I hope to see more tutorials from you <3
love it!
where did you get that cake stand!?? its perfect!
A tip I learned was to dip your spatula in just under boiling water. Wipe the water off with a paper towel and immediately smooth your cake. It works like magic and helps get it even more smooth!
Do you have a source on your cake stand? Hicken at gmail dot com<br />It's super cute
Fabulous. One question can i use royal icing and then cover the cake with fondant ????? Thanks<br />
I wouldn't suggest using royal icing as it hardens and will be like a rock when people try to eat it. Fondant over buttercream would probably be a tastier alternative! <br />https://whisk-kid.com/2010/08/how-to-make-swiss-meringue-buttercream.html
Thanks for writing this tutorial! It was really helpful, especially since I don't usually make frosted layer cakes (mine are usually simple, everyday, one-layer affairs). I linked this page in my blog post about a chocolate cake. Of course, my frosting isn't nearly as professional-looking as yours. (:
Thanks for mentioning "deflating" the frosting!!!! I didn't know how on earth to get rid of all the air bubbles. Will try this next time I have to make icing.
Thank you so much for posting this I followed all your steps and my cake came out wonderful. 'Im so glad I found this page.
WOW! This looks like a lot of work but that cake sure does look flawless! Thanks for sharing!
Thank you so much for sharing this tutorial! My question would be which of the frosting is more suitable for warmer weather? Or for piping something on the top. Thank you.
I'm a little late to the party, but thank you so much for this tutorial. I will definitely be using it next time I frost a cake. V@SproutsHouse xox
PERFECT!!! Thankyou so much for this and pictures, I cannot wait to give it a crck!
this is such an awesome tutorial…thank you!
Great tutorial 🙂 what kind of buttercream are you using?? Thank you
Hi, i think this will be very helpful!! Can you frost any cake with it?? How about victorias sponge? What buttercream are you using? ? <br />Thanks!!<br />
. I was wondering if you use a certain attachment in stand mixer to deflate. Since I usually make Italian meringue buttercream I use the whip but do I need to change to the paddle for deflating it?
Hi Kate!
I do! I think the larger holes in the paddle make it better for deflating.
I love to bake and have always been pretty good at decorating but your directions are the best I have ever seen. Very concise and easy to follow, you should definitely teach classes, look into your local parks and rec, I’m sure they would love to have you.
You’re so kind, Krista! Thank you!!
Thanks so much for linking to me! Your blog is beautiful <3